Privacy on macOS, protect your digital life effectively
Your Mac's default settings are leaking your data. Location, Siri, FileVault, Apple ID: the settings to change in 15 minutes.
Introduction
September 2026 Update. On macOS 27, the “Apple Intelligence & Siri” pane from step 5 is now simply called “Siri”, and Siri AI adds its own settings there, including “App Access” and a way back to Siri Classic. We cover them in our radar on Siri AI.
September 2026 Update. Mullvad is discontinuing its public DNS resolver and sponsoring Quad9, the addresses 194.242.2.2 and 194.242.2.3 listed below stop responding on 2 November 2026. If you entered the Mullvad addresses, replace them with Quad9’s.
Apple bills itself as the “champion of privacy” among Big Tech. But the default settings of macOS aren’t configured with your interests in mind. Out of the box, the system comes with Siri enabled, suggestions everywhere, background analytics, accessible location services for apps without clear justification, disk encryption turned off, and iCloud data encryption also disabled.
We’re going to fix this in 15 minutes, once and for all. You’ll need a Mac running macOS Tahoe (26.x), Sequoia (15.x), or Sonoma (14.x), and nothing else. By the end, your Mac won’t be sharing your data with Apple, advertisers, and overly curious apps.
Read this: What is digital sovereignty and how to practice it
Before you start
What you’ll need:
- A Mac running macOS Tahoe (26.x), Sequoia (15.x), or Sonoma (14.x)
- 15 minutes
- Nothing to install
What will change:
- Location services limited to apps that really need them
- Less data sent to Apple in the background (analytics, Siri, diagnostics)
- Safari locked down against cross-site tracking
- Disk encrypted with FileVault + recovery key stored securely
- iCloud data encrypted end-to-end with Advanced Data Protection + recovery key
- Apple ID protected by 2FA + recovery key
What won’t change:
- Your VPN (that’s a whole other topic)
Read: Why you need a VPN
- The behavior of third-party apps (they keep their own settings)
Warning: all operations are reversible. None disable critical functionality. If you find a setting hinders your daily use, you can reactivate it on a case-by-case basis.
Steps
Step 1: Localization, Audit, and Limit
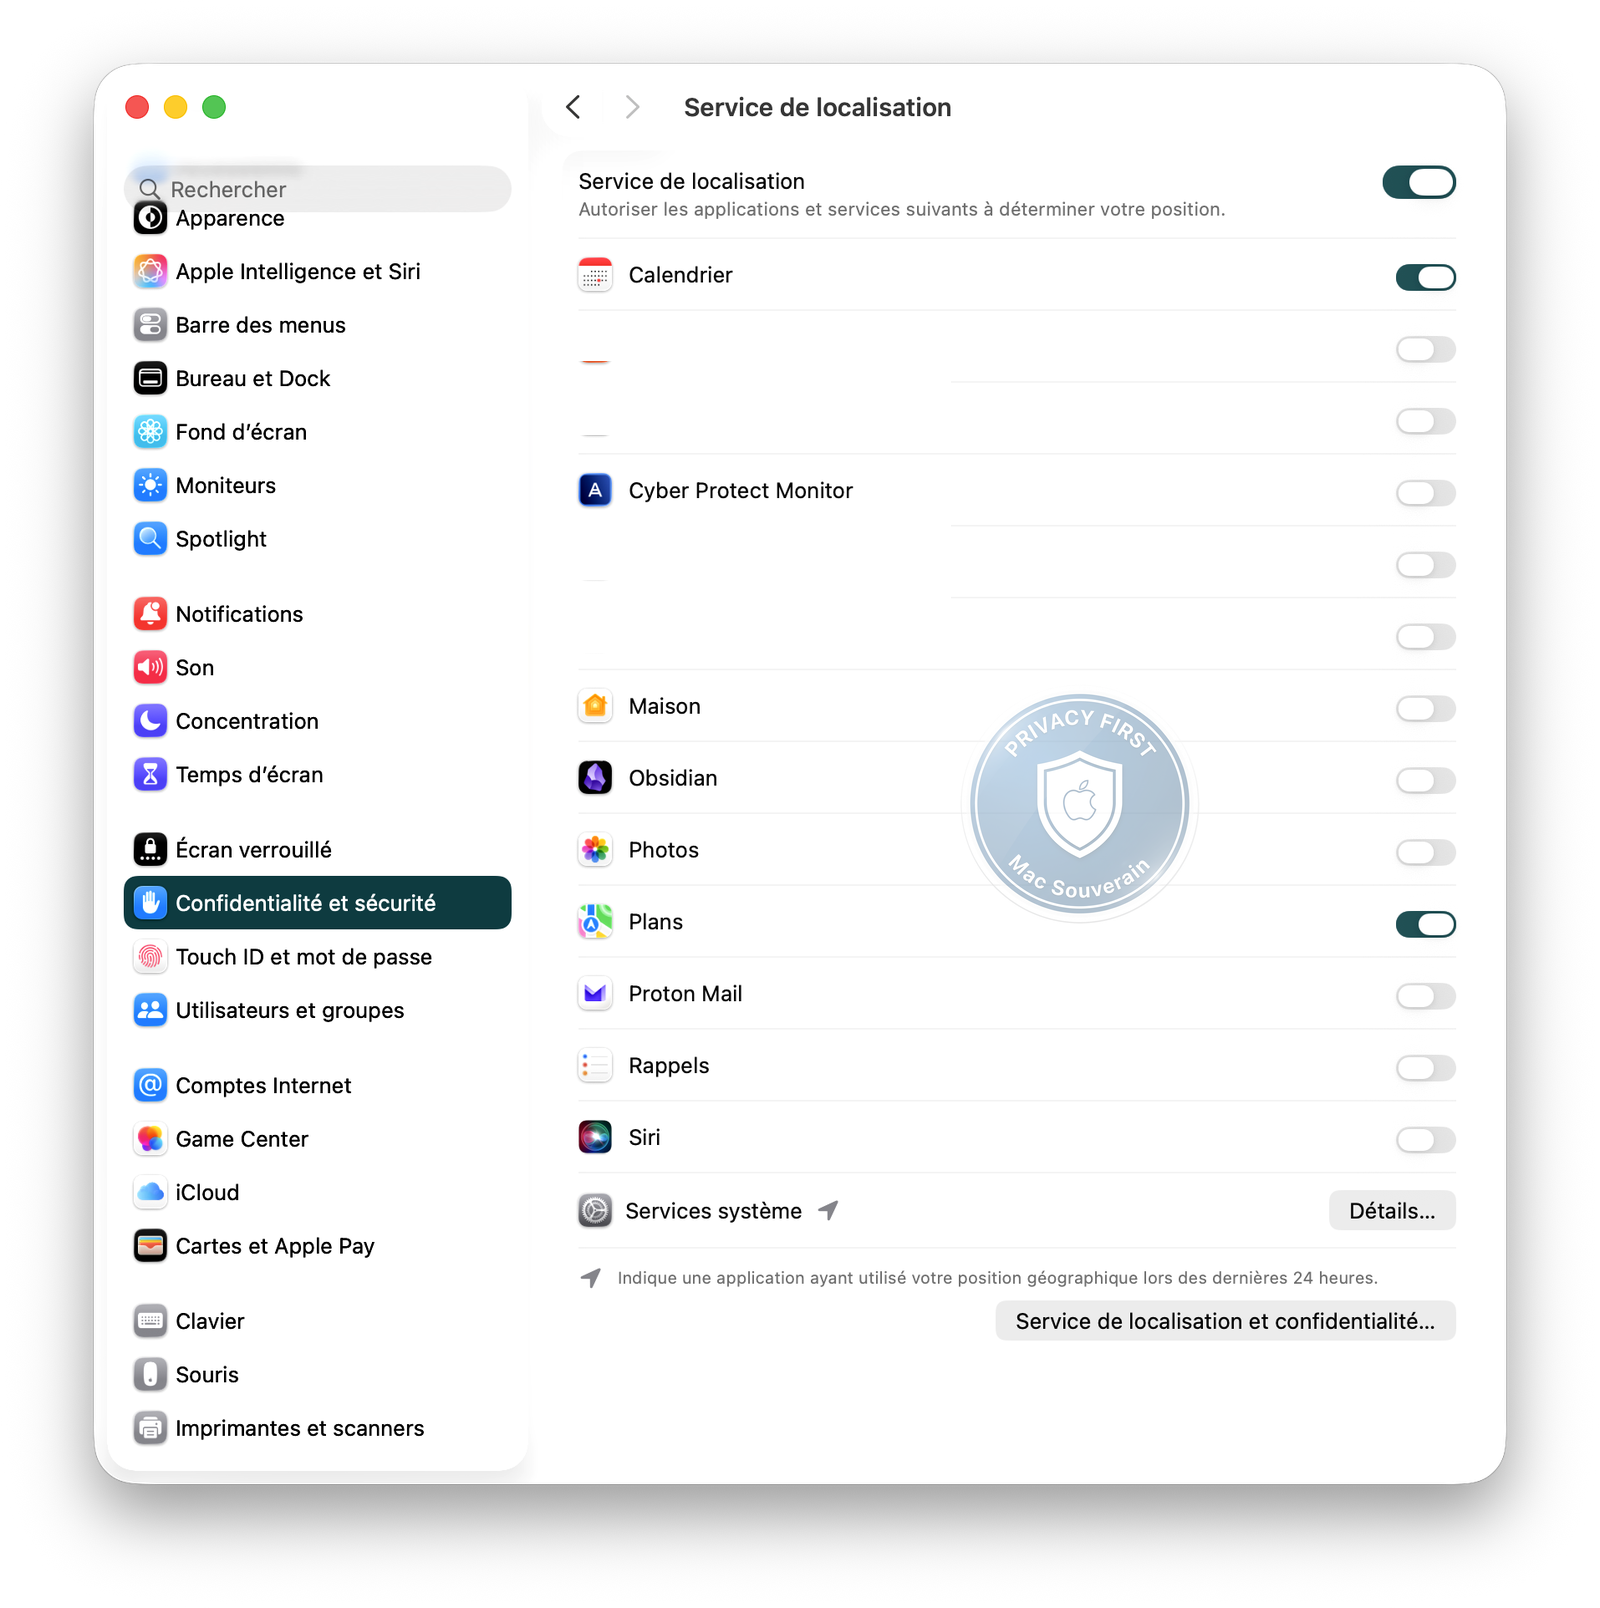
Path: System Preferences > Privacy & Security > Location Services
Location Services lets apps know your GPS location in real-time. Some need it to function (Maps guides you, Weather shows the right city), others use it for silent geolocation profiling.
For each listed app, assess if it genuinely needs access to your location:
- Maps, Weather: necessary for their core function
- Banking apps, productivity tools: not necessary, they work fine without it
Disable location access for apps that don’t need it.
What you should see: toggle enabled only for apps that have a legitimate reason to know your location.
Step 2: System Services Localization, Disable Silent Collection
Path: System Preferences > Privacy & Security > Location Services > System Services (at the bottom)
Disable:
- Location-Based Suggestions: macOS uses your geolocation to suggest “relevant” results in Spotlight and Safari. In reality, it builds a profile of your movements.
- Location Diagnostics: sends your GPS coordinates to Apple to “improve the service.” Translation: Apple knows where you are, all the time.
- Improve Maps: quietly collects your travel routes to enrich Apple Maps. Your movements become free mapping data for Apple.
Enable “Menu Bar Icon” to see when a service accesses your location.
What you should see: the arrow icon in your menu bar when an app accesses your location.
Step 3: Disable Apple Advertising Tracking
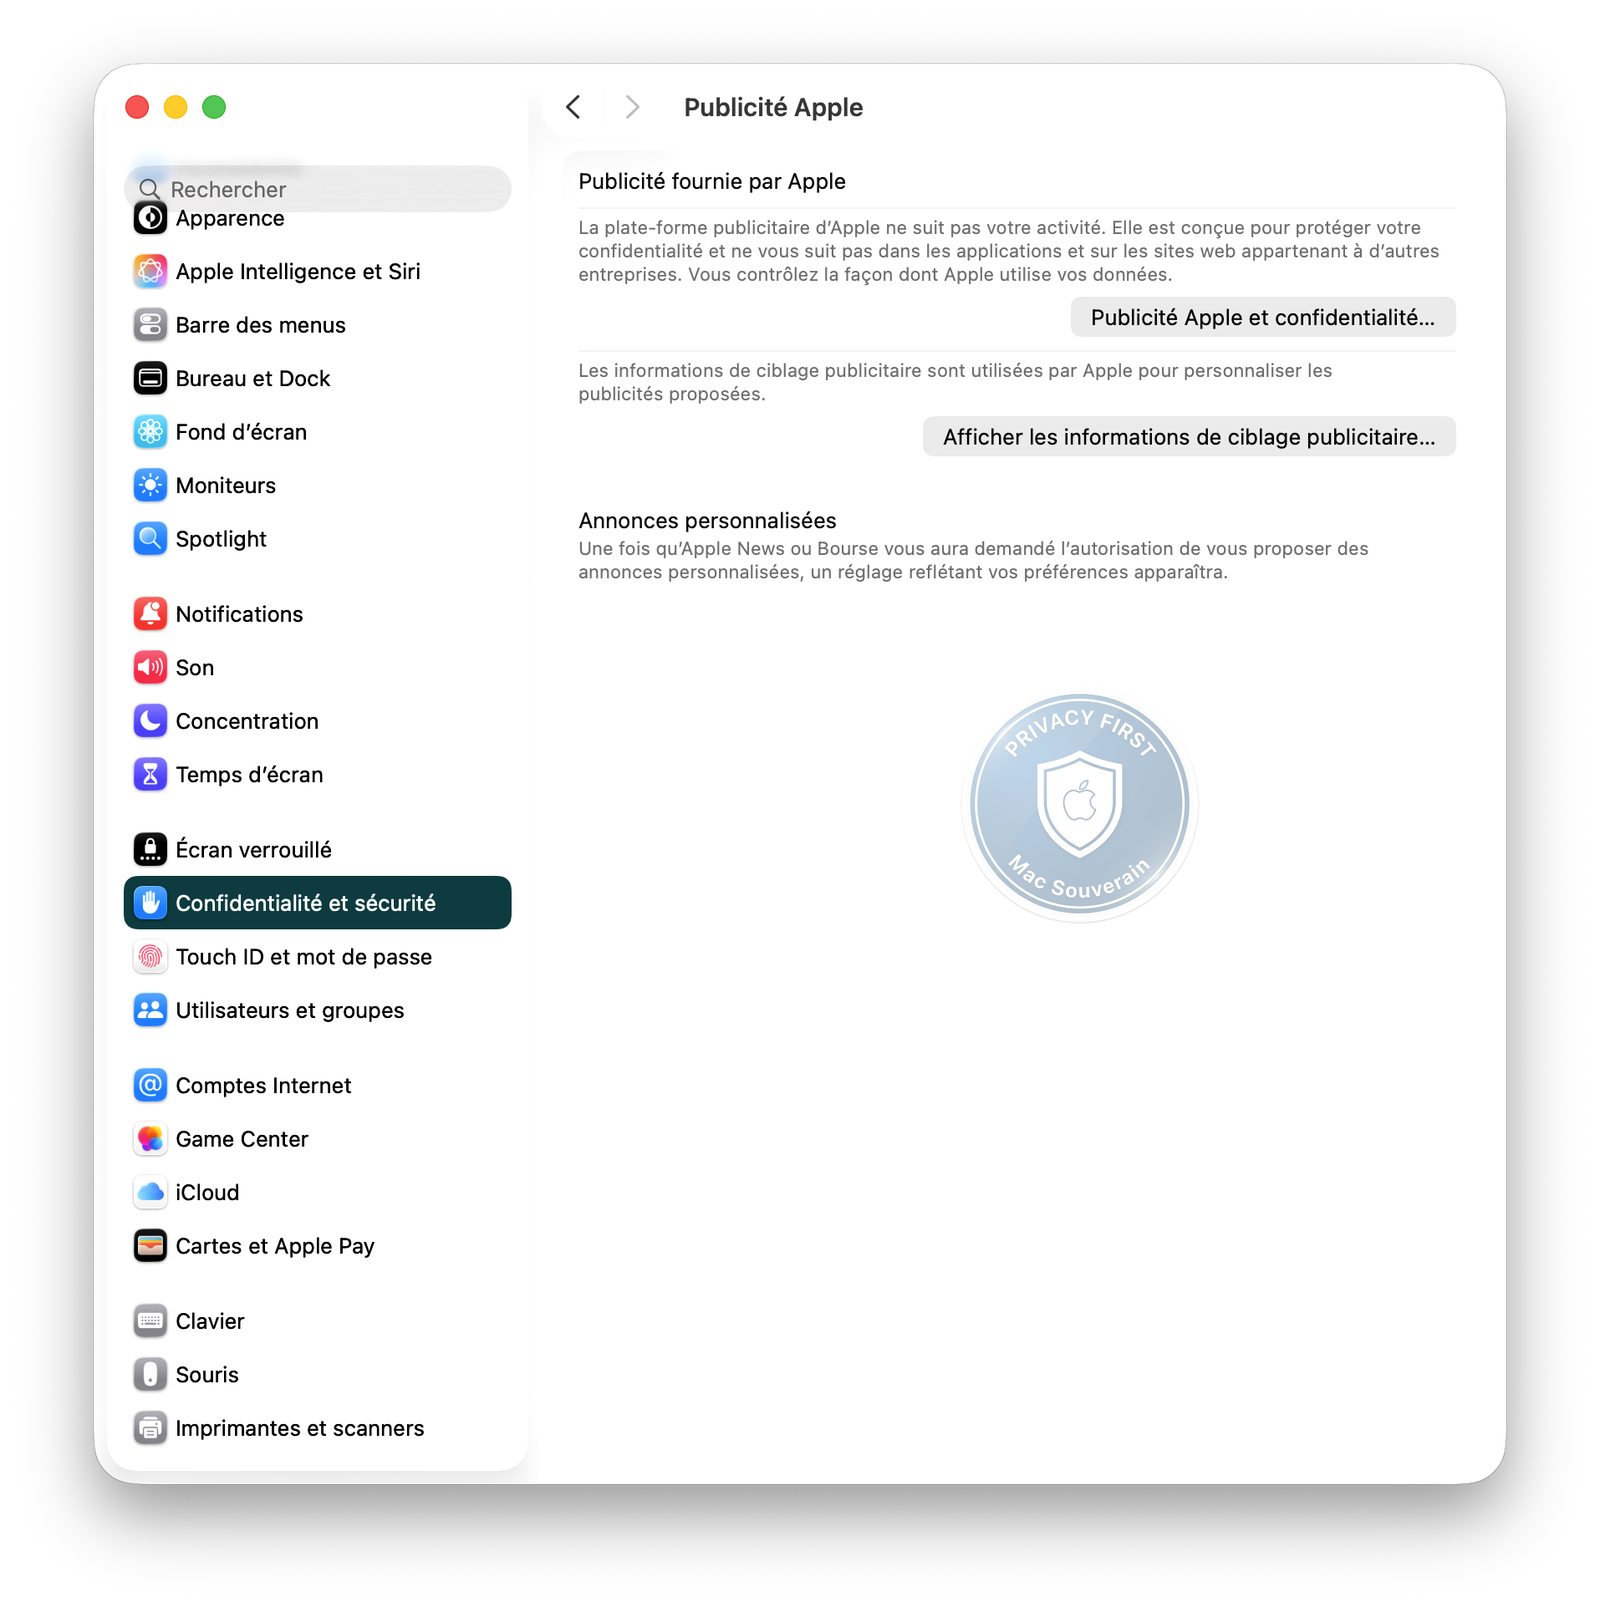
Path: System Settings > Privacy & Security > Apple Advertising
Apple creates an advertising profile based on your App Store purchases, location, and Apple News/Stocks usage. This profile is used to serve you personalized ads in the App Store and Apple News. Yes, even Apple engages in targeted advertising.
Turn off “Personalized Ads”. You can also view the advertising profile Apple has generated for you, to see the level of profiling already in place.
What you should see: toggle turned off.
Step 4: Analytics and Improvements, Uncheck Everything
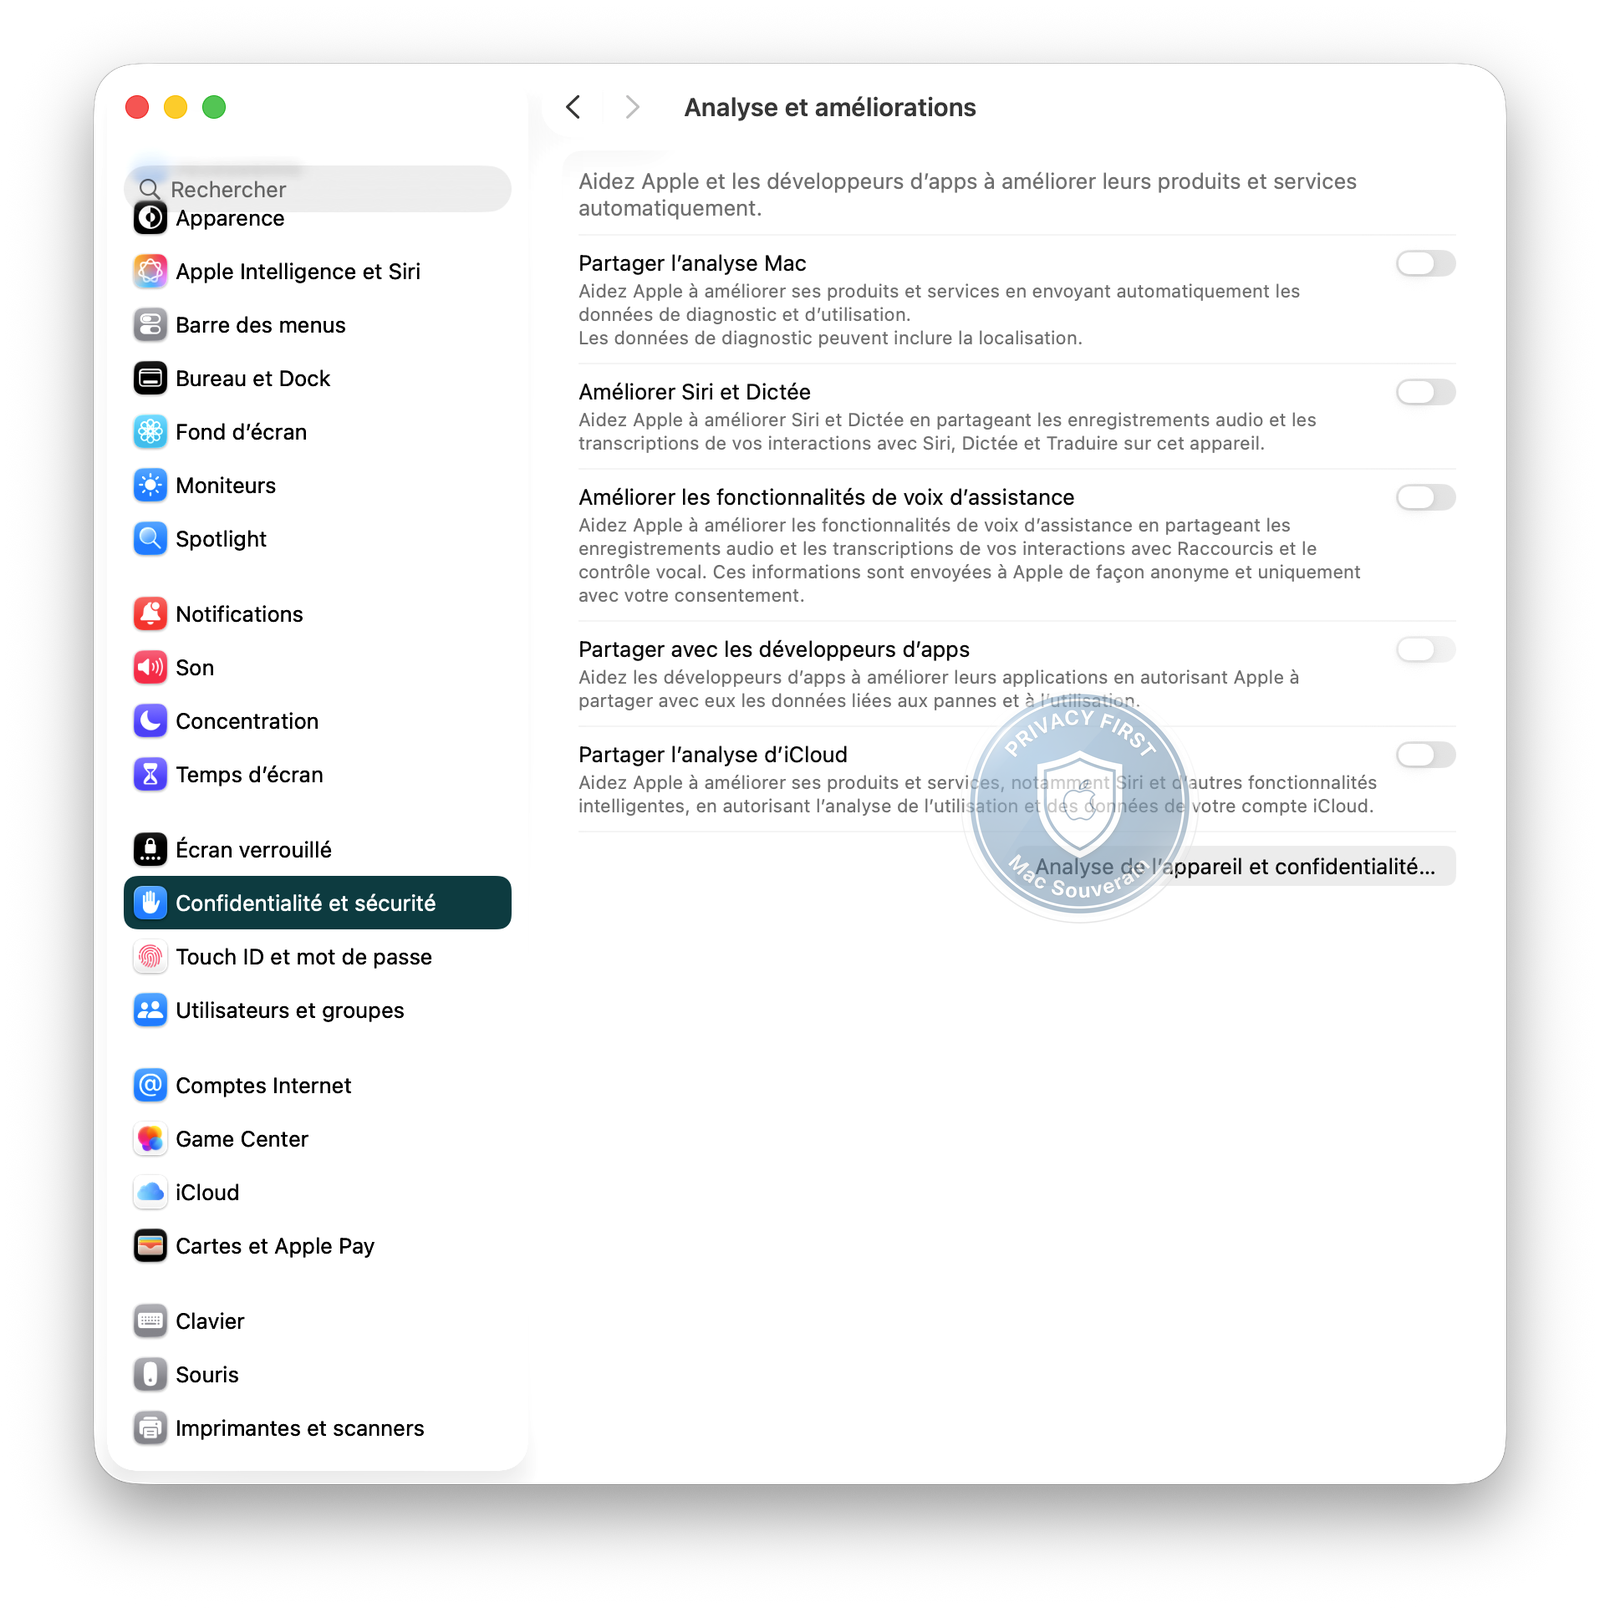
Path: System Preferences > Privacy & Security > Analytics & Improvements
These options send usage data from your Mac to Apple and developers. In other words, your Mac regularly reports back on what you’re doing.
Uncheck all the options:
- Share Mac Analytics: sends crash data, app usage, and performance to Apple. Useful for Apple, not you.
- Share With App Developers: sends third-party app usage stats to developers. You become a free beta tester without knowing it.
- Share iCloud Analytics: same deal, but for iCloud services. Apple watches how you use Drive, Photos, Mail.
- Improve Siri & Dictation: the most intrusive. Apple records audio snippets of your Siri interactions, and real people listen to “improve the service”. Yes, actual people, you read that right. Not all the time, but you can’t predict when.
What you should see: all boxes unchecked.
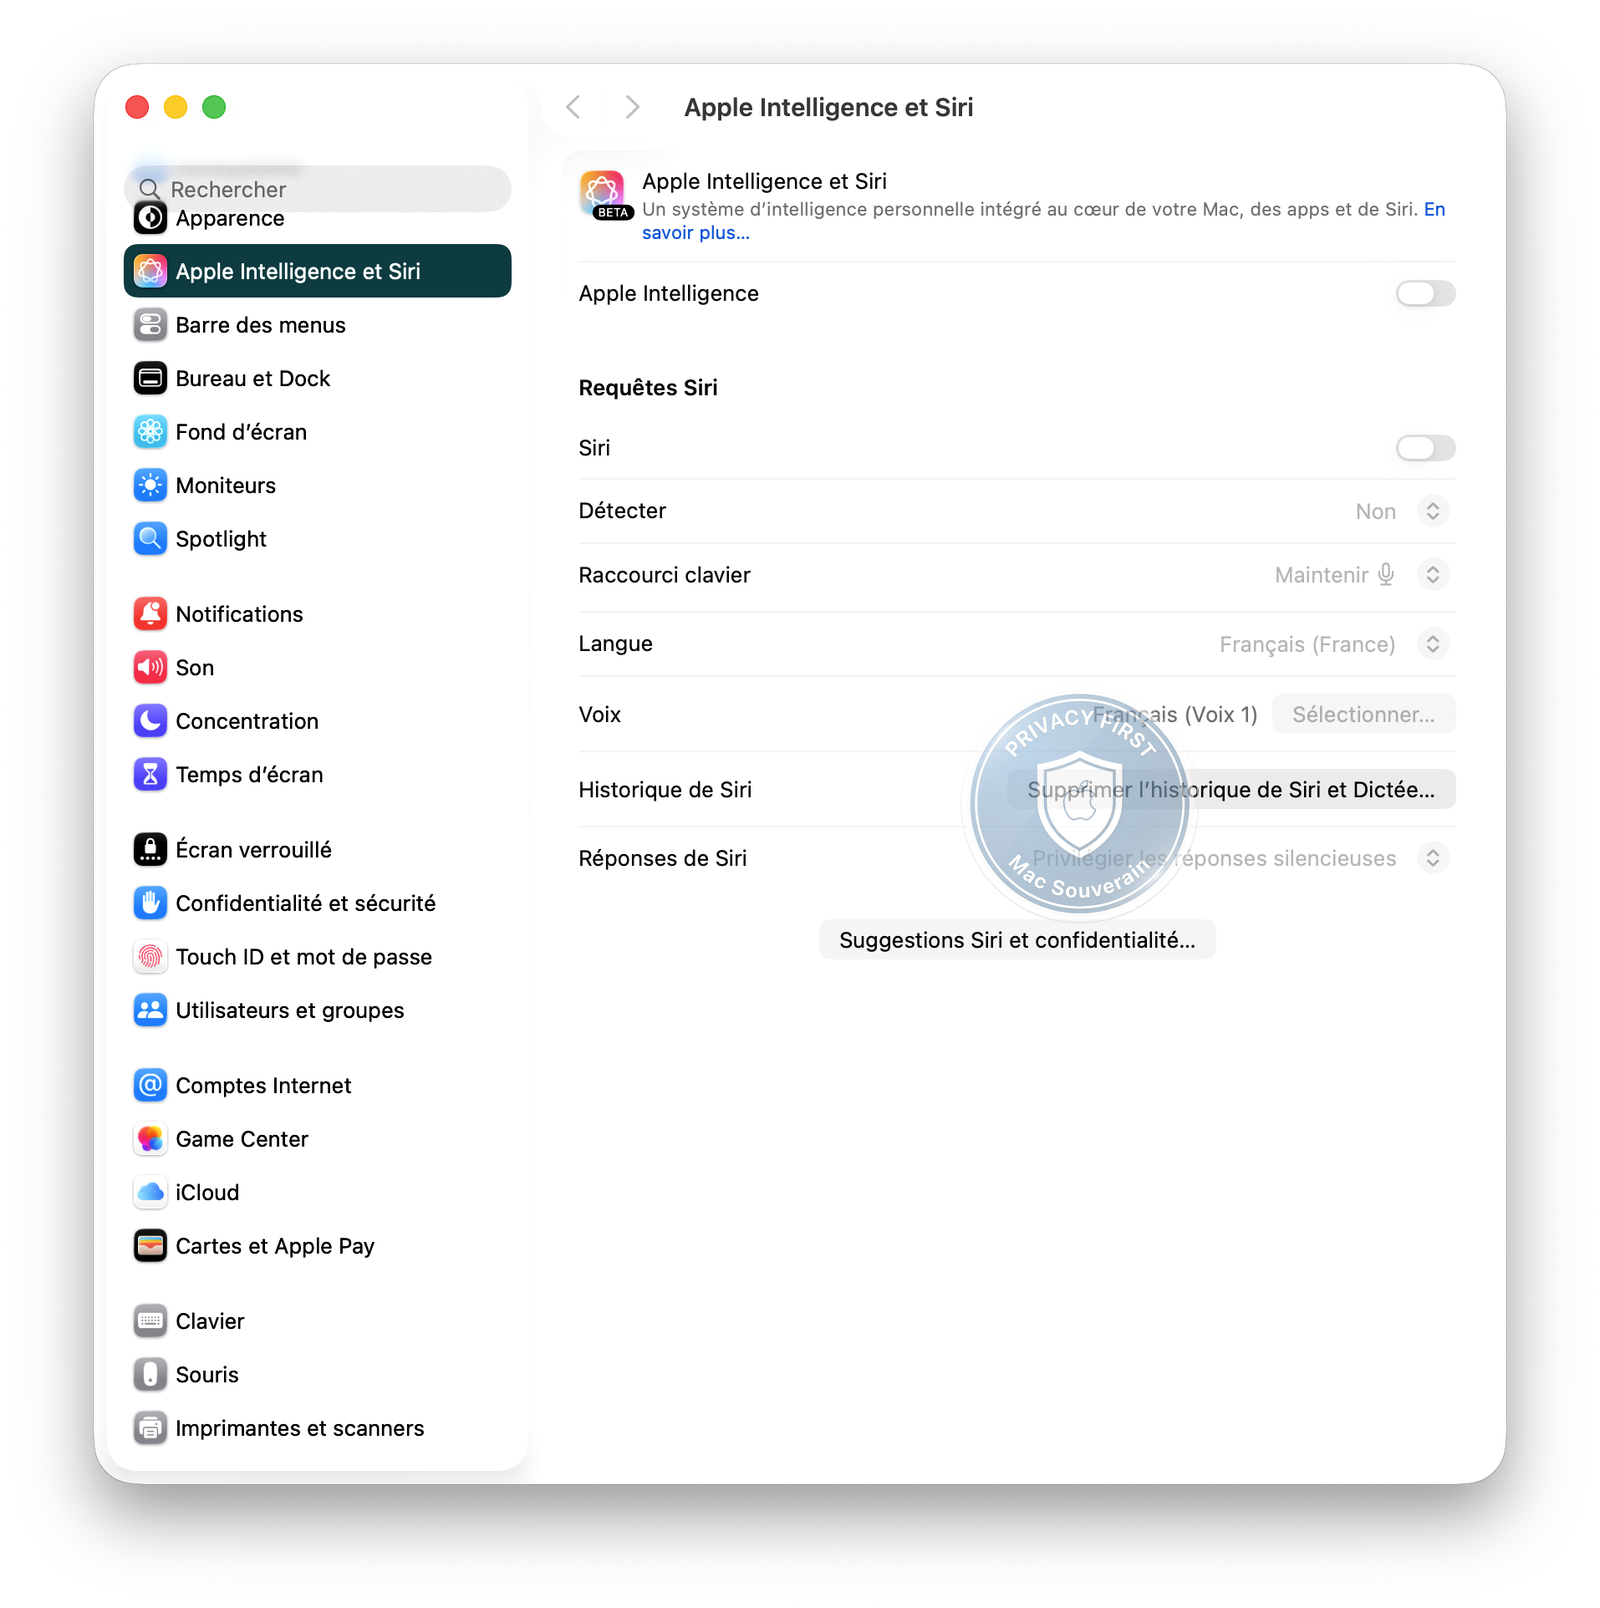
Step 5: Siri, disable or limit
Path: System Settings > Apple Intelligence and Siri
Note: On macOS Tahoe 26.x, Siri has merged with Apple Intelligence.
Siri constantly listens for the keyword “Hey Siri” and sends your voice requests to Apple’s servers for processing. With Apple Intelligence, Siri also accesses your messages, emails, and calendar to respond “in context”. Convenient, but it means Apple potentially has access to all that. And if “Improve Siri and Dictation” is turned on, samples of your voice interactions are sent to Apple, where real human employees listen to “improve service quality”. Apple admitted this in 2019 after The Guardian revealed the practice. Since then, it’s opt-in, but the option is enabled by default on a new Mac.
If Siri isn’t regularly used, disable “Ask Siri” completely.
For active users, at least disable “Improve Siri and Dictation” and clear the history via “Clear Siri and Dictation History”.
What you should see: Siri disabled, or at least improvement and history purged.
Step 6: Spotlight, Stop Online Leaks
Spotlight is your Mac’s built-in search engine (Cmd + Space). By default, every search you type gets sent to Apple’s servers and partners (potentially including Google) to provide “relevant suggestions”. You look for a local file, Apple knows.
Access Spotlight preferences (Cmd + Space, then settings icon) and turn off:
- Siri Suggestions: sends your search terms to Apple for web results, locations, and news. Each keystroke = a server request.
- Internet Results: same deal, but via a third-party search engine. Your local search becomes a web search.
- Movies / Music: queries Apple TV+ and Apple Music catalogs with each search. Search for a file named “Batman”, Apple suggests the movie.
Keep local sources for fast search without data leaks.
What you should see: only local categories (Applications, Documents, Folders, etc.) are checked.
Step 7: Safari, Block Tracking
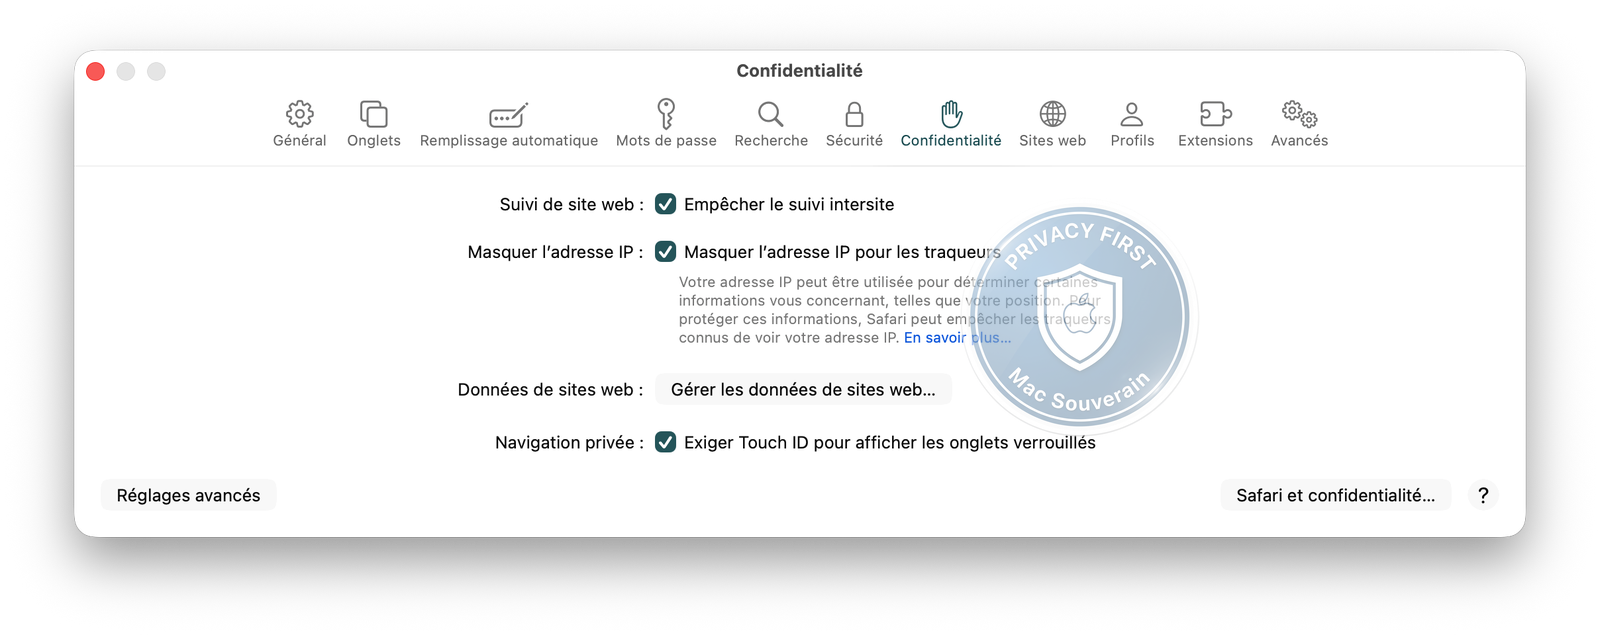
Path: Safari > Settings > Privacy
Websites embed trackers (cookies) from Facebook, Google, and other ad networks that follow you from site to site to build a profile of your interests. Safari can block this natively.
- Turn Prevent Cross-Site Tracking on: blocks third-party cookies and trackers that follow you from one site to another. Facebook won’t know you visited a shoe site right after reading a hiking article.
- Turn Hide IP Address from Trackers on: routes your requests through an Apple relay so trackers can’t identify you by your IP. Your IP address is almost unique, hiding it makes profiling harder.
Path: Safari > Settings > Search Engine > Search Engine
Switch from Google to DuckDuckGo or Brave Search. Google keeps each search and associates it with your ad profile. DuckDuckGo and Brave don’t keep history and don’t profile you.
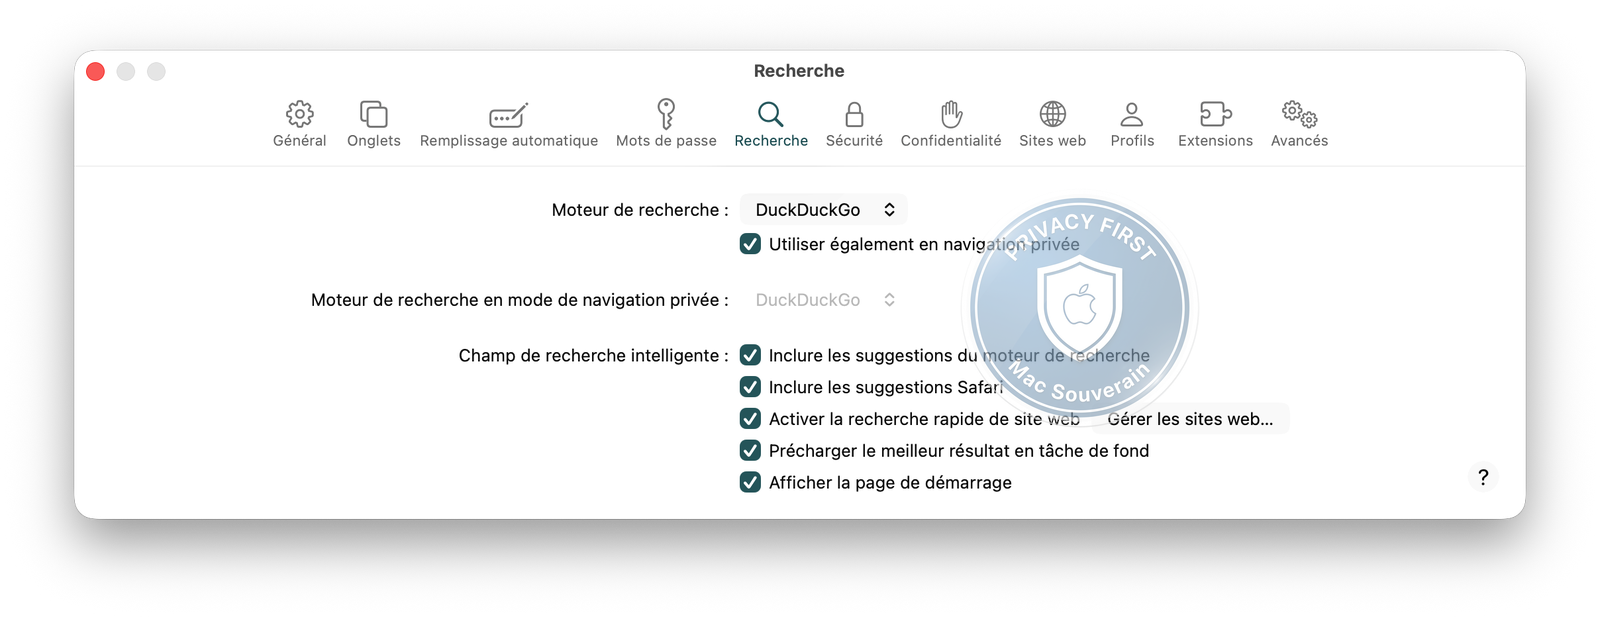
What you should see: both privacy boxes checked, search engine changed.
Step 8: DNS, Fix the Weak Link
Path: System Preferences > Network > Wi-Fi (or Ethernet) > Advanced > DNS
Every time you type an address in Safari, your Mac asks a DNS server to translate that name into an IP address. By default, that request goes to your ISP, in other words, unencrypted. Your ISP sees every site you visit, even if you’ve locked down everything else.
Replace the default DNS servers with ones that don’t profile you:
Quad9 (recommended), Swiss non-profit foundation, no logging, built-in blocking of malicious domains:
9.9.9.9149.112.112.112
Mullvad DNS, Swedish company, zero logging, optional ad+tracker blocking:
194.242.2.2(standard)194.242.2.3(with ad blocking)
To change:
- Open System Preferences > Network > Wi-Fi (or Ethernet, depending on your connection)
- Click Advanced next to the active network
- DNS tab
- Remove existing servers (your ISP’s)
- Add the addresses above
Repeat for each network you use (home Wi-Fi, office, etc.). DNS is tied to the network, not the system.
What you should see: Only Quad9 or Mullvad addresses in the DNS list, no ISP servers.
For further reading: A dedicated article on DNS and DNS encryption (DoH/DoT) is coming soon to MacSouverain.
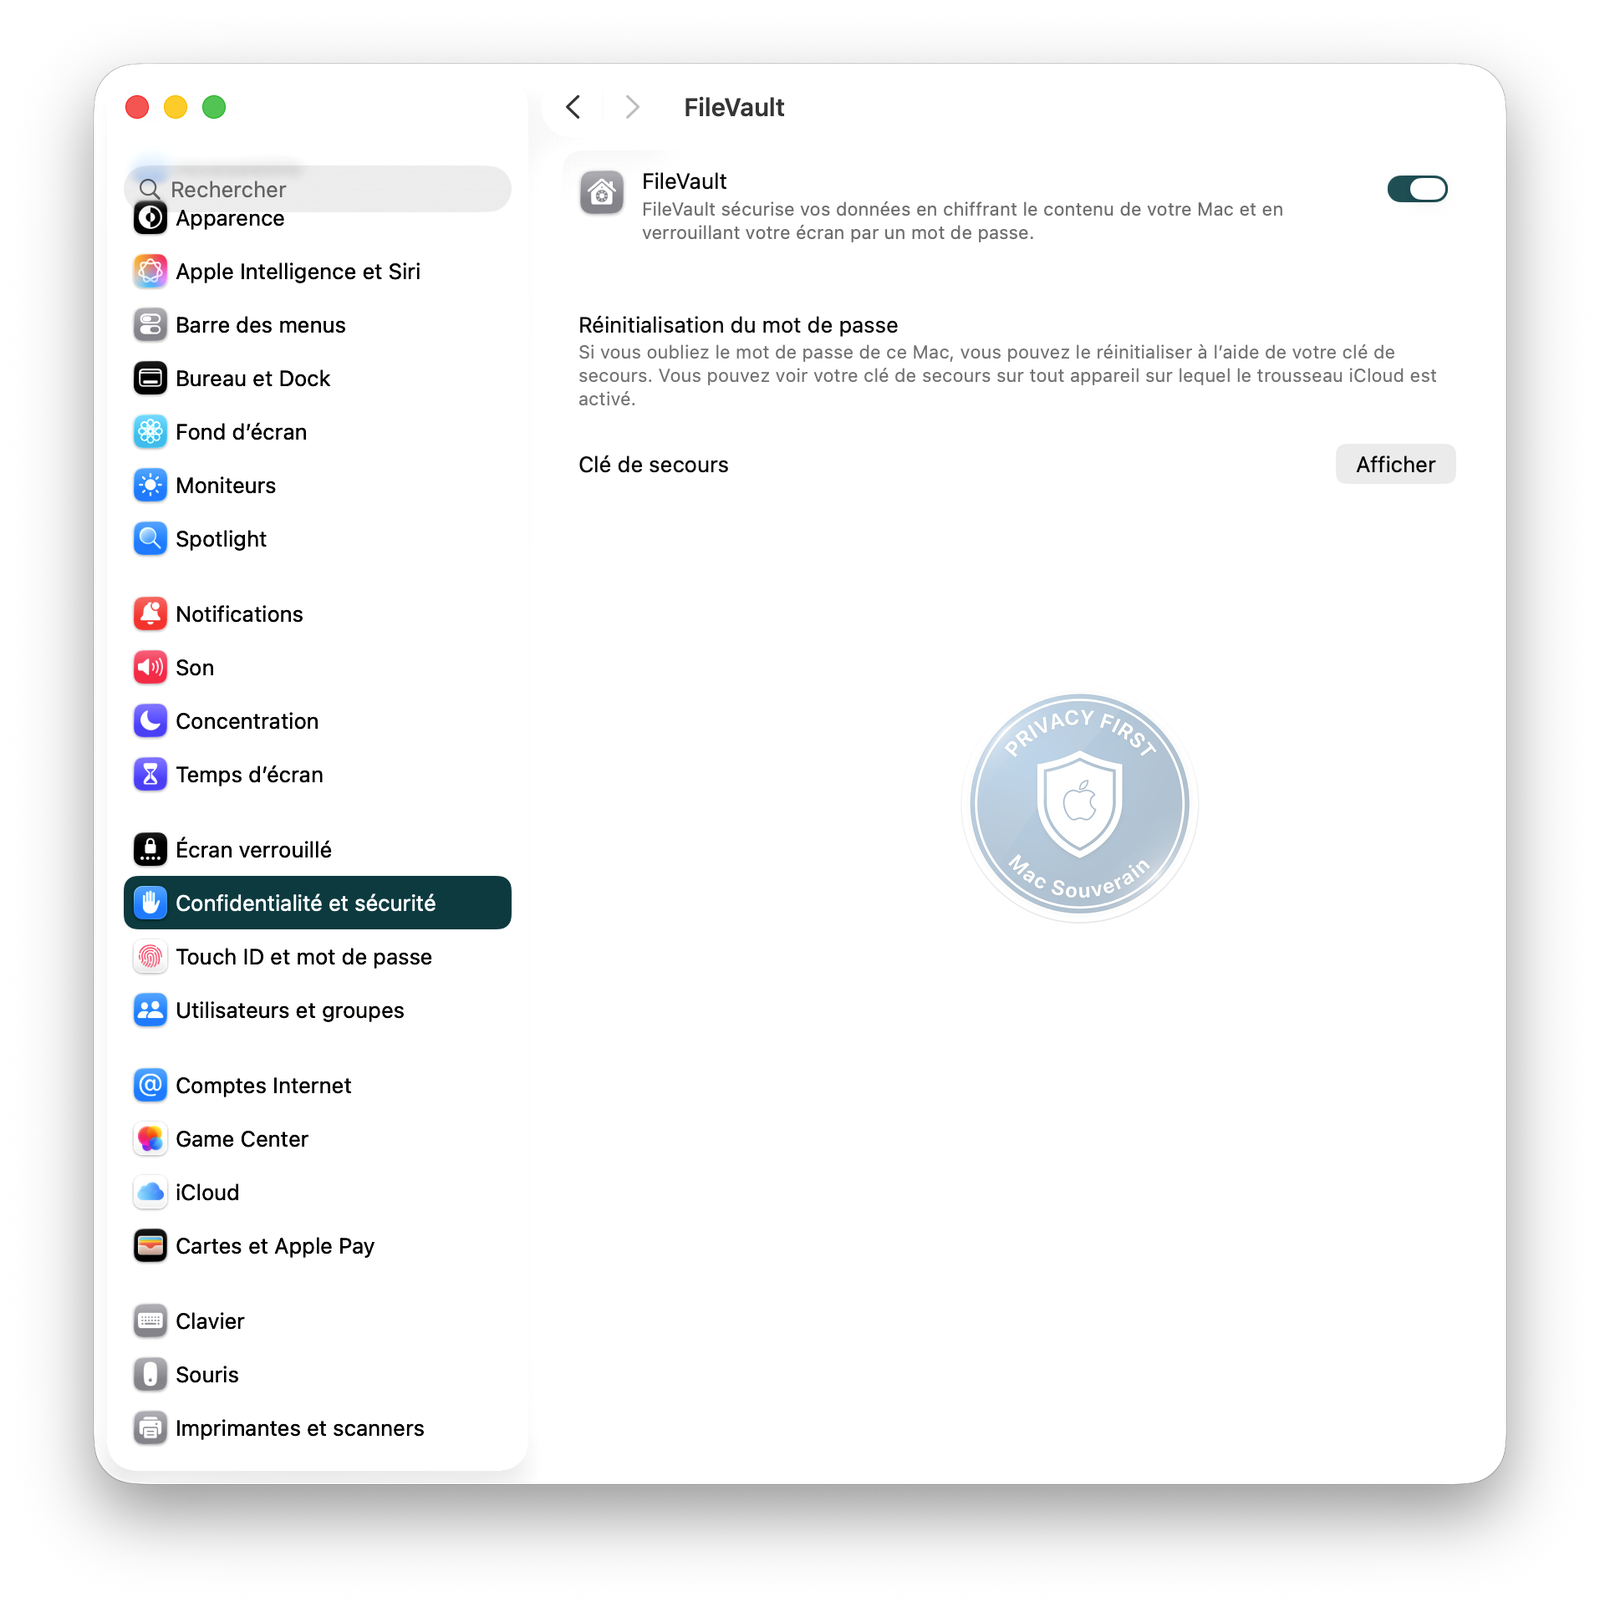
Step 9: FileVault, Encrypt the Disk
Path: System Preferences > Security & Privacy > FileVault
FileVault is Apple’s full-disk encryption. Without it, anyone with physical access to your Mac (theft, loss, repair) can read all your files by booting from an external drive. With FileVault, your SSD’s contents are unreadable without your login password.
On Macs with Apple Silicon (M1+), FileVault benefits from Secure Enclave, making the SSD unreadable even when removed from the machine.
Read: Apple Silicon and Security: What Secure Enclave Really Changes
Generate and store the recovery key in a safe place, not in iCloud or on the Mac:
- Option 1: Third-party password manager : Bitwarden (open-source, free) or 1Password. A digital vault that stores all your passwords and sensitive keys behind one master password.
- Option 2: Offline : Printed or handwritten, stored in a physical safe or sealed envelope in a secure location, far from the Mac. Impenetrable remotely, unalterable by ransomware.
What you should see: FileVault shows “Turned On”. Recovery key noted and stored off the Mac.
Losing both the password and the key = permanent data loss. That’s not a bug, that’s encryption working.
Step 10: iCloud Keychain, Check and Clean
Since macOS Sequoia/Tahoe, the Passwords app functions as a standalone application. It’s iCloud Keychain with a real interface: it stores your passwords, security keys, and one-time codes, all encrypted and synced across your Apple devices. Touch ID or Face ID unlocks access, your biometrics replace the master password entry, making it both faster and more secure than typing a password manually.
Open the app and check:
- Security Recommendations: The app compares your passwords against known data breach databases. If a password appears in a breach, change it immediately; someone might already have it.
- Reused Passwords: Using the same password on multiple sites is like giving out a master key. If one site gets hacked, all your accounts with the same password are compromised. Generate a unique identifier for each account; the app keeps track of them for you.
- Integrated 2FA Codes (TOTP): Two-factor authentication adds a temporary code (6 digits, renewed every 30 seconds) in addition to your password. Even if someone steals your password, they can’t log in without the code. Enable it wherever possible.
For accounts outside the Apple ecosystem, 2FAS (open-source) or Bitwarden do the same across all platforms.
What you should see: zero security alerts in the Passwords app (or a plan of action to resolve them).
Step 11: Apple ID, the Key to Your Kingdom
Your Apple ID is the key to your entire Apple ecosystem. It controls iCloud (your files, photos, emails), your devices (location, remote wipe), your purchases (App Store, subscriptions), and your passwords. If someone gains control of your Apple ID, they have access to everything. Literally everything.
Apple’s 2FA (Two-Factor Authentication): A temporary code sent to a trusted device along with your password. Without it, your Apple ID relies solely on a password.
Path: System Settings > [Your Name] > Privacy & Security > Two-Factor Authentication
Enable if not already activated.
Apple ID Recovery Key: A 28-character code that lets you regain control of your account if you lose access to your trusted devices. Without it, an account lock could be permanent.
Path: System Settings > [Your Name] > Privacy & Security > Recovery Key
Generate and store securely (not on Mac, not in iCloud).
Connected Devices:
Path: System Settings > [Your Name] > Devices
Check and remove any unrecognized or old Macs not disconnected.
What you should see: 2FA enabled, recovery key generated, no unknown devices.
Advanced optional: A Yubikey 5C NFC (~60 euros for a pair) is a physical USB key you plug in to authenticate. Impossible to phish remotely like SMS or email codes. Open FIDO2 standard, works without a phone. Downside: lose both keys = unrecoverable access.
Step 12: iCloud on the Web, Close the Attack Surface
Path: System Settings > [Your Name] > iCloud > Access iCloud Data on the Web
icloud.com offers full access to your data (emails, contacts, photos, notes, files) from any browser. That means anyone with your Apple ID and password can snoop through your entire iCloud from a café across the globe. Turned off by default. Turn on briefly when needed, then turn off again.
What you should see: toggle turned off.
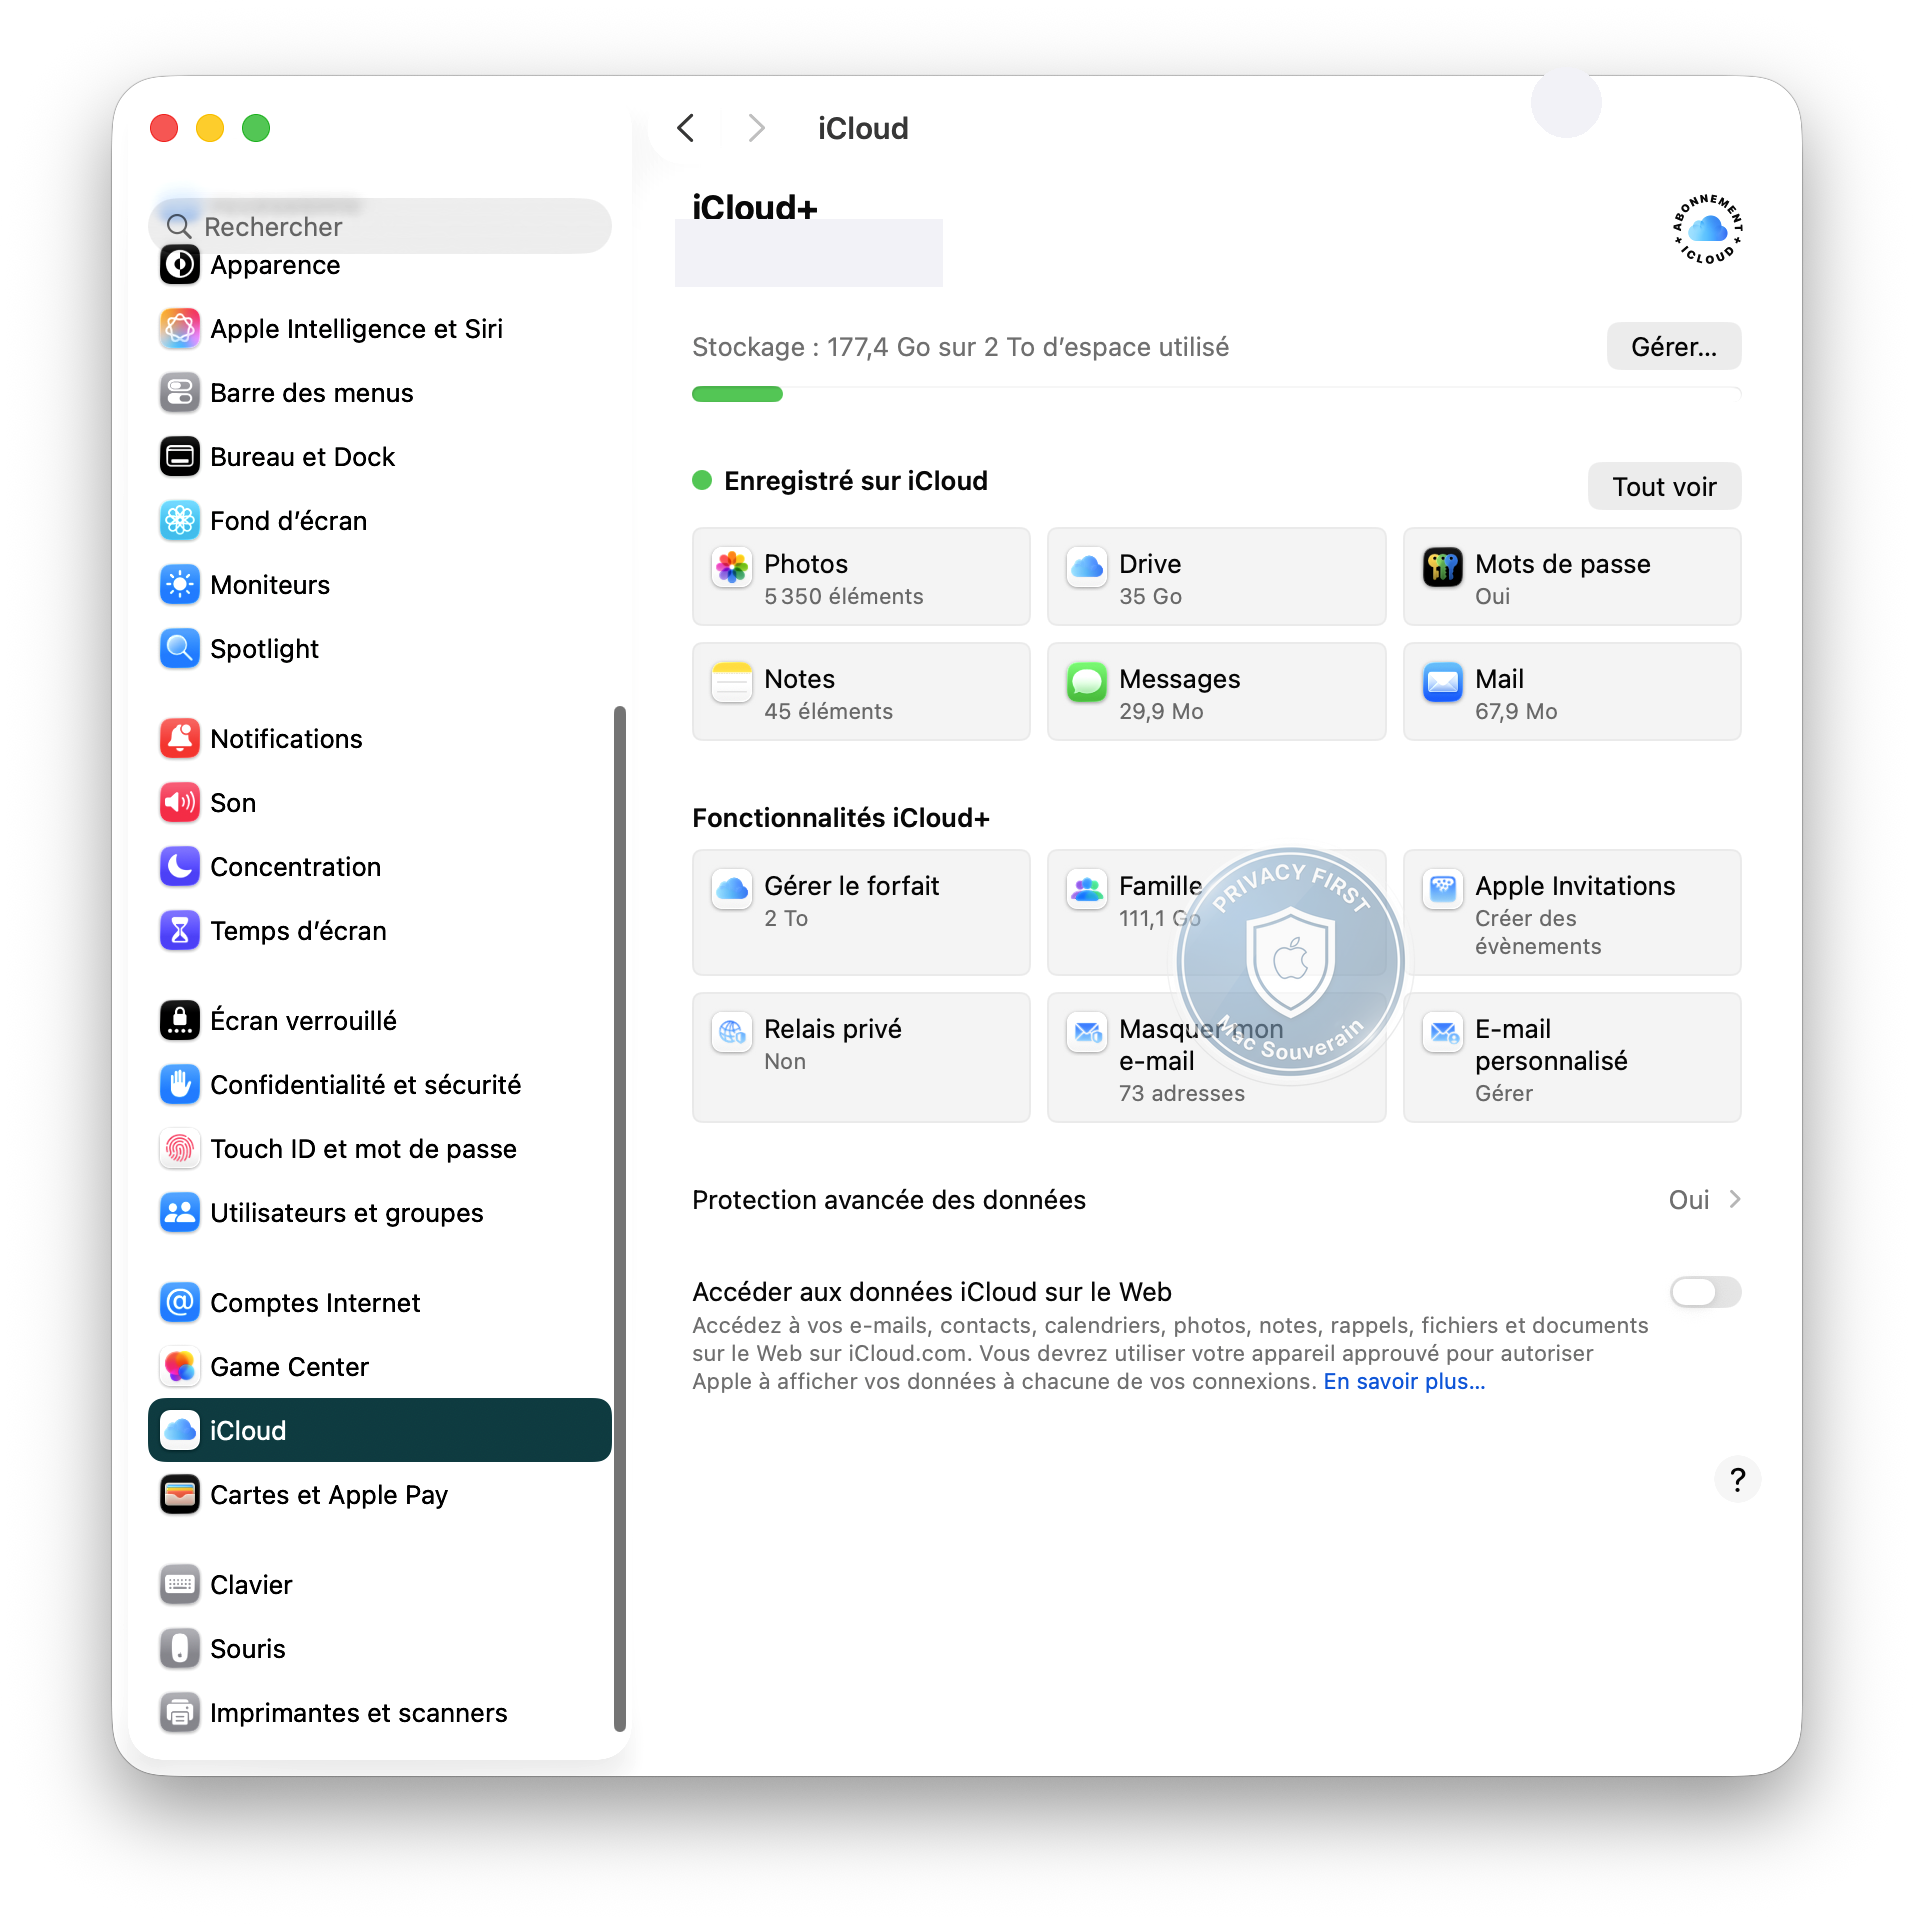
Step 13: Advanced Data Protection, the Lock on iCloud
Path: System Settings > [Your Name] > iCloud > Advanced Data Protection
By default, iCloud isn’t end-to-end encrypted. Apple holds the decryption keys for most of your cloud data, allowing them to comply with court orders and government requests. And governments aren’t shy about asking: according to a Proton analysis of Apple transparency reports, the number of accounts disclosed increased by 927% between 2014 and 2024. Not a bug, a strong trend.
Advanced Data Protection (ADP) changes that. Once enabled, only your trusted devices hold the encryption keys for nearly all your iCloud data (backups, photos, notes, iCloud messages, and around twenty other categories). Apple can’t read your data, even if forced. Even in case of an Apple server breach, your data remains unreadable.
Proof that it’s bothering someone: Apple removed ADP in the UK in 2025, under pressure from the British government demanding access. No UK users can enable it. In France and Europe, ADP remains available.
Enable it. It’s in your settings, takes 30 seconds.
Two things to know before enabling:
- Recovery Key Required (separate from your Apple ID key): if you lose all your trusted devices and your ADP key, your iCloud data is unrecoverable. Apple can’t help you, literally. That’s the price of encryption that works.
- Exceptions: iCloud Mail, Contacts, and Calendar remain readable by Apple, even with ADP enabled. For contacts and calendar, it’s a technical constraint (standard CalDAV/CardDAV protocols). For mail, it’s Apple’s choice. Your iCloud mail transits and resides in plaintext on their servers. If you want email nobody can read but you, the solution exists.
Sources: Apple Transparency Report | Apple Support: Advanced Data Protection for iCloud
What you should see: Advanced Data Protection displayed as “Enabled”. Recovery Key generated and stored off the Mac.
Step 14: Lockdown Mode, the ultimate protection (optional)
Path: System Settings > Privacy & Security > Lockdown Mode
Lockdown Mode is Apple’s final lock. Available since macOS Ventura and iOS 16, it severs the most exploited attack surfaces by state-sponsored spyware: WebKit’s JIT compiler, WebAssembly, preview attachments, unapproved USB connections, 2G networks.
It’s a radical measure designed for high-risk profiles (journalists, activists, lawyers), but also relevant for crypto holders. In four years, no documented mercenary spyware compromise on a device with Lockdown Mode enabled.
The compromise in practice: some Safari extensions stop working, navigation performance drops in benchmarks. Daily life remains almost unchanged.
Understand everything about Lockdown Mode against exploit kits.
If It’s Not Working
Problem: FileVault Won’t Activate
Probable Cause: Insufficient disk space or active guest account. Solution: Check free space (minimum 10% recommended) and delete unused guest accounts.
Problem: Spotlight Can’t Find Anything
Probable Cause: You’ve disabled too many categories. Solution: Re-enable Applications, Contacts, Documents, Folders. They’re local sources, no data leakage.
Problem: An App Keeps Asking for Location
Probable Cause: The app refuses to work without constant location access. Solution: If the app is crucial, set it to “While Using”. If it’s not, uninstall it and find an alternative.
For the Impatient
This article locks down your Mac’s privacy settings in 15 minutes. Location services, analytics, Siri, Safari, FileVault, Apple ID: everything that leaks your data to Apple and third parties is cut or limited.
Concretely, the settings:
- System Preferences > Privacy & Security > Location Services = Audit each app, “While Using” max
- System Preferences > Privacy & Security > Location Services > System Services = Suggestions, Diagnostics, Maps = Disabled
- System Preferences > Privacy & Security > Apple Advertising > Personalized Ads = Disabled
- System Preferences > Privacy & Security > Analytics & Improvements = All unchecked
- System Preferences > Apple Intelligence & Siri > Ask Siri = Disabled
- Spotlight > Siri Suggestions, Internet Results = Disabled
- Safari > Preferences > Privacy > Prevent Cross-Site Tracking = Enabled
- Safari > Preferences > Privacy > Hide IP Address from Trackers = Enabled
- Safari > Preferences > Search > Search Engine = DuckDuckGo
- System Preferences > Privacy & Security > FileVault = Enabled, key saved off-Mac
- System Preferences > [Your Name] > Connect & Security > Two-Factor Authentication = Enabled
- System Preferences > [Your Name] > Connect & Security > Recovery Key = Generated
- System Preferences > [Your Name] > iCloud > Access iCloud Data on the Web = Disabled
- System Preferences > [Your Name] > iCloud > Advanced Data Protection = Enabled, recovery key saved off-Mac
Need tech terms explained? Check the glossary.