CrowdSec up front, blocking before they hit you
Install CrowdSec on your hardened VPS, block malicious IPs upstream with the bouncer firewall, and feed its decisions into Wazuh.

Series · episode 4 of 7Build Your Sovereign SIEM Contents
- Prologue Build your sovereign SIEM for SMEs, compliant with GDPR/NIS2 without CLOUD Act
- 1 Your sovereign SIEM's foundation, a hardened VPS outside the CLOUD Act
- 2 Wazuh all-in-one, your homegrown Splunk for the price of a VPS
- 3 Deploy Wazuh everywhere, your SIEM finally sees your network
- 4 CrowdSec up front, blocking before they hit youyou are here
- 5 Rspamd in front of your inbox, phishing stops at the doormat
- 6 Santa on your Macs, the uninvited binary stays at the door
- 7 Alerting and total cost, the final tally of your sovereign SIEM
Episode 4: The Community Network Defense
In the previous episode, you enrolled Wazuh agents on all your machines. Servers, Linux, Mac, Windows, every machine sends its logs to the manager through the Tailnet. Your SIEM has lifted its nose from its own logs, your entire park is displayed before it. It sees everything, including attacks.
But here’s the catch. An agent Wazuh observes, as we’ve repeated all throughout episode 3. It tells you that a burst of failed connection attempts has just hit your server, it tells you very well, very quickly, very detailed. But it does nothing to stop it. You have eyes, but no hands.
Today, we give you hands. We install CrowdSec, the first active defense line in the series. An engine that reads your logs like Wazuh, but unlike Wazuh, it draws a conclusion and blocks. The IP that’s hammering your SSH, it puts it outside. The attacker already spotted elsewhere on the community network, it blocks it before it even knocks on your door.
A point raised since episode 1 and still holds true. Almost all your services live in Tailnet-only, invisible from the open internet. But some doors must remain open to the world, a mail server receiving on port 25, a public web presence. Those are the doors CrowdSec guards.
This stack, I use daily. The commands that follow are the ones you’ll type yourself, in order, on your hardened VPS then in your Wazuh manager.
Before you begin
Three things to keep in mind before the first command.
What you need. A hardened VPS like the one from episode 1, up-to-date, with at least one service exposed to the open internet to protect. The Wazuh manager from episode 2, operational, for the integration at the end of the tutorial. Administrator access on the machine. And something to read your own logs, /var/log/auth.log and your service logs, since that’s CrowdSec’s raw material.
What changes. At the end, known malicious IPs no longer reach your services, they hit your firewall before. You also benefit from the community list, millions of signals uploaded by other users, so you block attackers you’ve never seen yourself. And your SIEM finally sees this defense layer, every blockage is uploaded to Wazuh.
What doesn’t change. CrowdSec blocks at the network level, by IP address. It’s not an antivirus, not an exhaustive application firewall, not a replacement for your hardening from episode 1. It’s just another layer, the first one the attacker encounters, not the only one. And it blocks the IP, not the human behind it. An IP changes, defense plays on volume and speed, not infallibility.
How CrowdSec sees and blocks
Before installing anything, understand the mechanism. It’s based on three pieces that pass the baton to each other.
The security engine, the local agent. It reads your logs continuously, auth.log, your server web and mail logs. It passes them through scenarios, behavior rules like “six failed SSH attempts in ten seconds from the same IP, that’s brute force”. When a scenario triggers, the engine takes a decision, it writes this IP to a blacklist for a given duration, four hours by default for brute force.
The bouncer, the executor. The engine decides, but it doesn’t touch your firewall itself, that’s a design choice. The bouncer firewall, the one we’re interested in, applies the decision. It puts the faulty IP into your nftables or iptables. Engine and bouncer are separate, you can have several, one for the firewall, one in front of a reverse proxy web, each applies the same decisions at its level.
The community network, the CTI, for Cyber Threat Intelligence. It’s the multiplier. When your engine blocks an IP, it sends the signal to the central API, the address and the scenario. In exchange, you download the community list, the aggregate of signals from all users. Result, an IP that attacked a server in Poland this morning is already blocked on your machine this afternoon, before its first attempt.
Remember the flow, it commands everything else. Log read by the engine, scenario triggered, decision made, bouncer applies it on the firewall, signal shared, community list downloaded in return.
Step 1, install the engine
We start with the brain, on your hardened VPS. Two commands, one to declare the official CrowdSec repository, one to install.
curl -s https://install.crowdsec.net | sudo sh
sudo apt install crowdsec
The first line adds the CrowdSec repository to your sources list. The second installs and starts the engine.
The installation is smart on one point. At the end, CrowdSec scans the services it detects on your machine and installs the corresponding collections automatically. It sees an SSH server, it installs the crowdsecurity/sshd collection. An Nginx, it adds the web scenarios. You don’t have to guess what to watch, it deduces it from what’s running.
Check what’s been set up.
sudo cscli collections listYou should see the list of active collections, with the enabled mention. If a service isn’t covered, install its collection manually, for example sudo cscli collections install crowdsecurity/nginx then restart the service crowdsec. Everything is controlled with cscli, CrowdSec’s command-line tool, the equivalent of your agent_control on Wazuh’s side.
At this stage, the engine reads, analyzes and decides. But it doesn’t block anything yet. It holds a blacklist that nobody applies. It still needs its hands.
Step 2, put the bouncer that really blocks
The hands, that’s the firewall bouncer. It reads the engine’s decisions and translates them into firewall rules that really refuse traffic.
There are two variants depending on your firewall, one for nftables, one for iptables. Most recent distributions run on nftables by default.
sudo apt install crowdsec-firewall-bouncer-nftablesIf your machine is on the old iptables, replace the package with crowdsec-firewall-bouncer-iptables. The principle is the same. A detail for consistency with episode 1, if your firewall runs on ufw, know that ufw relies on one of the two backends depending on your version, check which one before choosing the bouncer variant.
The installation makes the connection itself. The package calls cscli bouncers add for itself, registers the bouncer with the engine and gives it an authentication key. No manual key handling.
Check that the engine and its bouncer talk to each other.
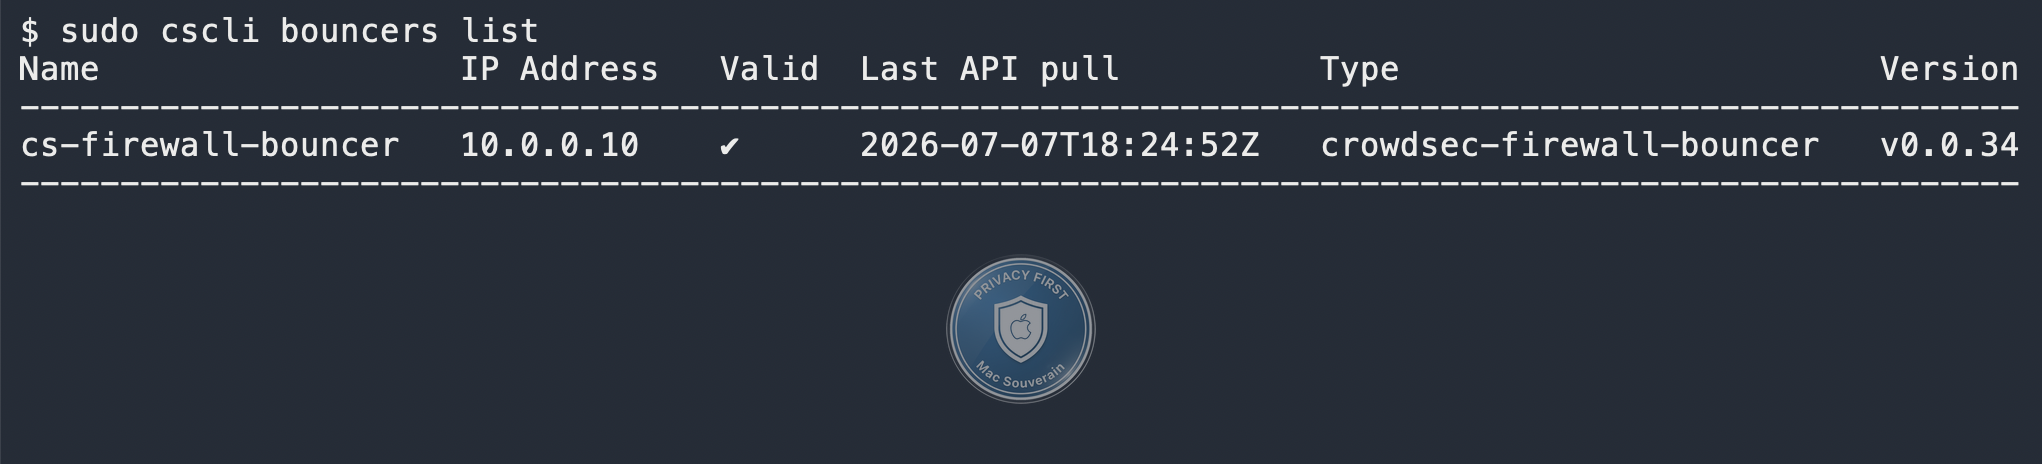
sudo cscli bouncers listYou should see your firewall bouncer listed, with a recent last activity date. From now on, the loop is closed. The engine decides, the bouncer applies, the faulty IP falls into a set blocked by your firewall. Your SIEM has hands.
Step 3, check that it bites
Three commands to make sure the machine is running, and one to put it to the test without waiting for a real attack.
First, the big picture.
sudo cscli metricsIt shows you how many log lines the engine has read, by source, and how many times each scenario has been triggered. If the counters are moving, your engine is seeing your logs. If they stay at zero, it’s not reading anything, and that’s a source issue to fix before going any further.
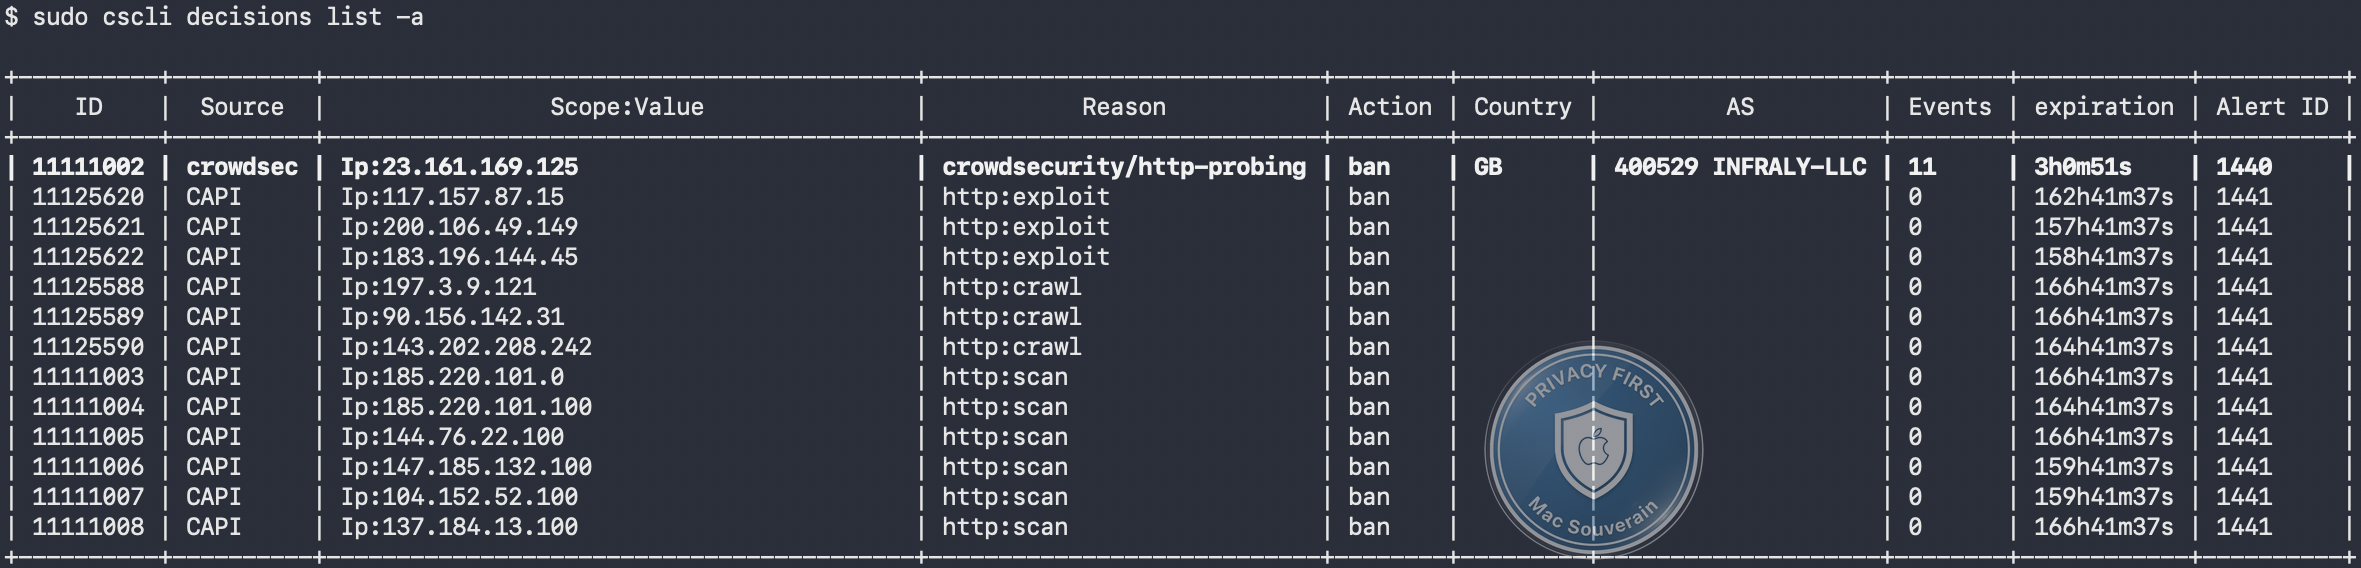
Next, the current decisions. Add the -a flag, otherwise CrowdSec will only show your local decisions and hide the IP addresses pulled from the community network.
sudo cscli decisions list -aOn a machine exposed for a few hours, it shouldn’t be empty. Each line is an IP address, the scenario that triggered it, and the remaining duration.
Look at the Source column. The CAPI lines are the community’s gifts, IP addresses you’ve never seen knocking on your door and are already being refused. The line in bold is yours, a scanner your own server caught in the act and banned all by itself, three hours in the corner. The collective and the local, side by side, in the same blacklist.
Finally, the test. Instead of waiting for an attacker, you create a test decision on a dummy IP address.
sudo cscli decisions add --ip 192.0.2.1 --duration 4h --reason "test block"
sudo cscli decisions list
The IP address 192.0.2.1 belongs to a reserved range for documentation, it won’t block anyone real. You see it appear in the list, the bouncer pushes it into your firewall. Clean up behind you once the test is successful.
sudo cscli decisions delete --ip 192.0.2.1If adding, displaying, and deleting work properly, your engine-decision-bouncer chain is operational end-to-end.
Step 4, the community signal, what goes out and what stays
This is where CrowdSec scales up, and it’s also the only place where honesty about sovereignty demands a sentence, so let’s put it out there without beating around the bush.
By default, your engine is registered with the central community API. You can check this with:
sudo cscli capi statusThis exchange works both ways, and it’s important to know exactly what’s going on. What goes out from your end, when you block an IP address, is a minimal signal: the faulty IP address, the scenario that triggered it, and the timestamp. What never goes out, are your logs, your machine names, your users, the content of anything. CrowdSec shares the conclusion “this IP address is attacking”, not the raw material that led to it. What comes in, is the community list, the anonymized aggregate of these signals across the entire network.
It’s a compromise, and it’s a clear one. You exchange the address of attackers, data that isn’t yours but belongs to your attackers, for collective protection that you couldn’t build alone. The engine remains self-hosted on your end, no third party pilots your blocks, no decision depends on a remote service that could be cut off. You can even opt out of sharing and run purely locally, you keep your defense, you just lose the community list. The balance is in your hands, as always in this series.
If you want a web console to visualize your alerts, CrowdSec offers one, for free, where you enroll your engine with sudo cscli console enroll <your-key>. Optional, and hosted by CrowdSec, so weigh it according to your line. Your real dashboard, anyway, is Wazuh, and that’s the next step.
Step 5, make CrowdSec show up in Wazuh
Your firewall blocks, great. But for now, your SIEM doesn’t know. CrowdSec acts on its own, Wazuh looks elsewhere. We connect them, so that every CrowdSec decision becomes a visible alert in your single dashboard.
The principle is simple and clean. CrowdSec knows how to write its alerts to a file, and Wazuh knows how to read a log file. We make them meet.
On CrowdSec’s side, you enable the file notification plugin. It already exists, you edit /etc/crowdsec/notifications/file.yaml to make it write in JSON format, one alert per line.
type: file
name: file_default
log_level: info
format: |
  {{range. -}}
   { "crowdsec": { "program": "crowdsec", "alert": {{. | toJson }} }}
  {{ end -}}
log_path: "/var/log/crowdsec/crowdsec_alerts.json"
rotate:
  enabled: true
  max_size: 500
  compress: true
Then you declare this channel in /etc/crowdsec/profiles.yaml, so the engine sends its alerts there.
notifications:
    - file_default
A detail that counts. The official CrowdSec tutorial writes this file to /tmp, which is emptied on every machine reboot. We put it in /var/log/crowdsec/ instead, so your alert history survives a reboot. A crowdsec service restart, and the /var/log/crowdsec/crowdsec_alerts.json file fills up with every decision.
On Wazuh’s side, you tell the local agent, the one from episode 3 already installed on this server, to read this file. You add this block to its configuration, ideally via the shared configuration for the group so you only have to write it once.
<localfile>
  <location>/var/log/crowdsec/crowdsec_alerts.json</location>
  <log_format>json</log_format>
  <label>crowdsec</label>
</localfile>
You recognize the <localfile> logic, it’s exactly the mechanism by which Wazuh swallows any log source. The json format tells it to parse each line as a structured object, and your crowdsec.alert.* fields become queryable in the dashboard.
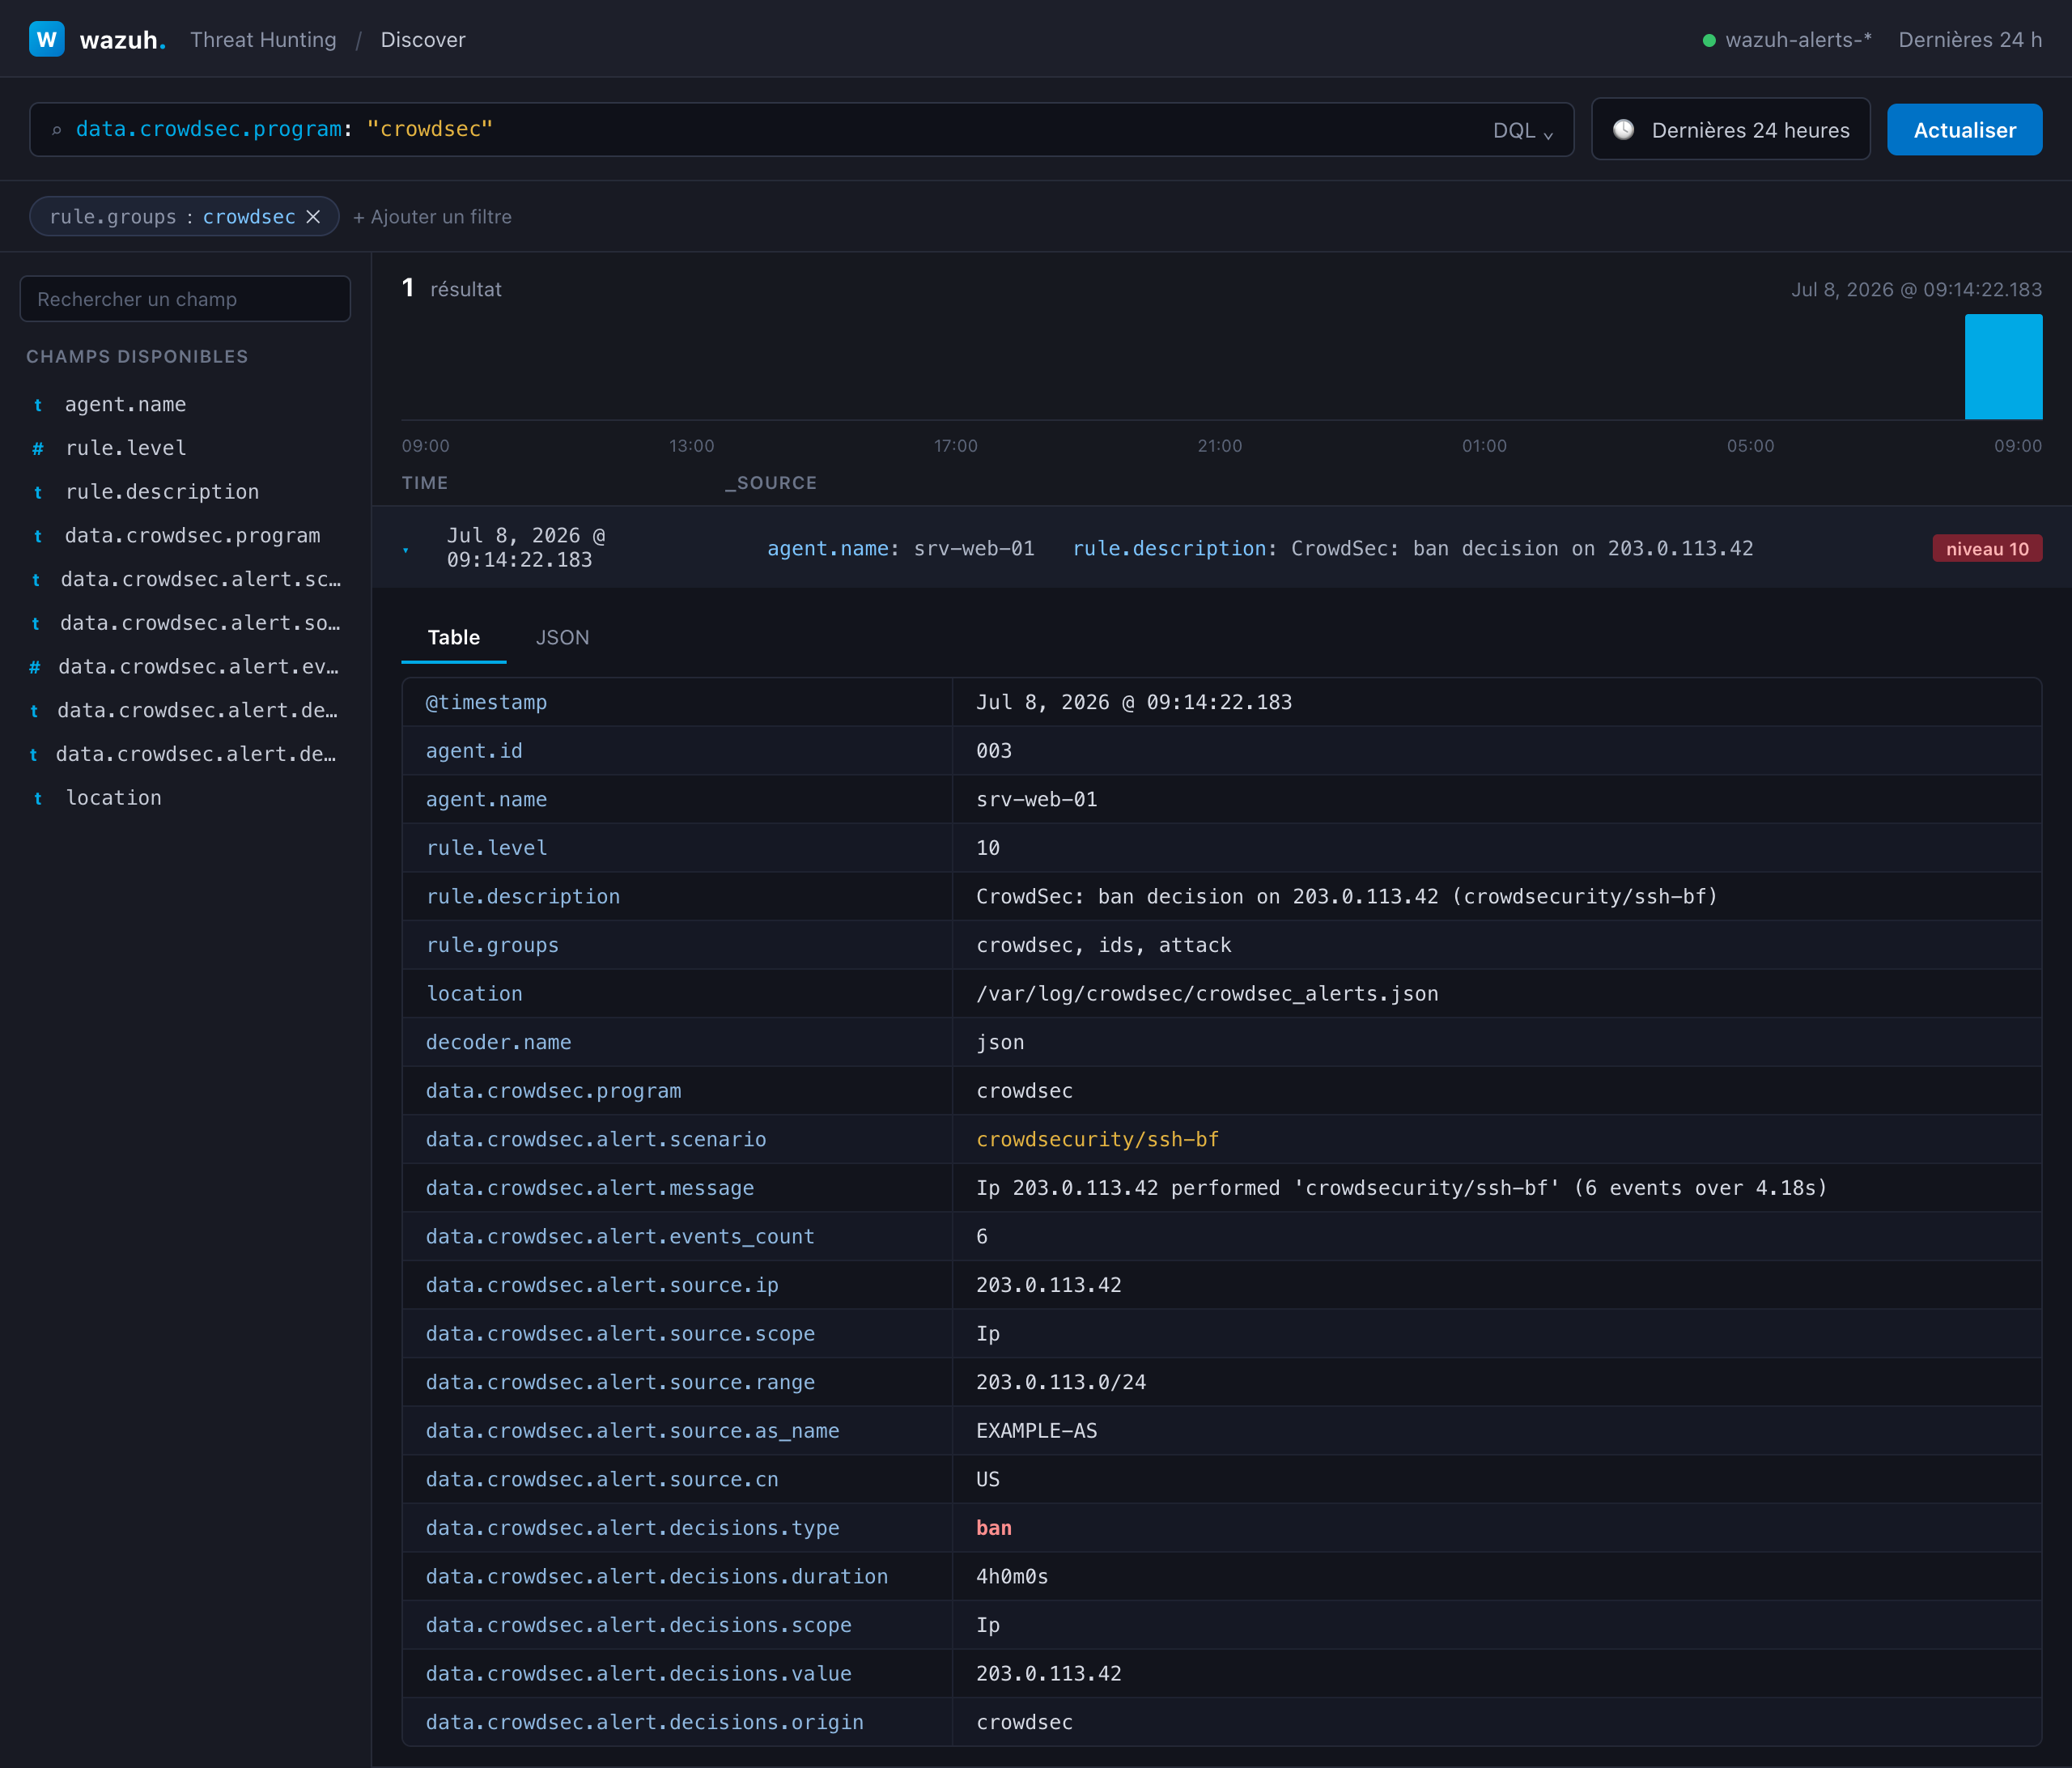
Restart the Wazuh agent, and the series’ loop is closed. An IP address attacks, CrowdSec blocks it, writes the alert, the Wazuh agent reads it, the manager sends it up, it shows up in your dashboard next to everything else. Your SIEM finally sees its own counterattacks.
A version note, because it matters. This integration via the file plugin assumes a recent engine and Wazuh version. Make sure your CrowdSec is at 1.6.3 or above and your Wazuh is at 4.9.0 or above, the versions from which this integration by the file plugin is officially supported. You’re running on Wazuh 4.x, this integration doesn’t depend on the future 5.0, it works on your current stack.
If it doesn’t work
The deployment of CrowdSec is straightforward, and it usually gets stuck at the same points. Here are the real ones, in the order you’ll encounter them.
Problem, cscli metrics shows zero lines read
Probable cause, the engine can’t find your logs, or it doesn’t have the collection for your service. It’s running, but it’s reading nothing.
Solution, make sure the log source exists at the expected path and that the service’s collection is installed with sudo cscli collections list. Install the missing collection, then restart the crowdsec service.
Problem, an IP address is decided but nothing is blocked
Probable cause, the bouncer isn’t there, or it isn’t talking to the engine. The engine decides on its own, nobody applies anything.
Solution, sudo cscli bouncers list should show your firewall bouncer with recent activity. If it’s absent, reinstall the bouncer package. If it’s present but silent, check that the bouncer service is running.
Problem, the wrong firewall backend
Probable cause, you installed the nftables variant of the bouncer on an iptables machine, or vice versa. The bouncer puts its rules in a system that your firewall doesn’t use.
Solution, identify your real backend, then install the corresponding variant of the bouncer, crowdsec-firewall-bouncer-nftables or crowdsec-firewall-bouncer-iptables.
Problem, nothing shows up in Wazuh
Probable cause, note that this is usually not a CrowdSec problem. The /var/log/crowdsec/crowdsec_alerts.json file grows on CrowdSec’s side. If it grows, the diagnosis is on Wazuh’s side, the <localfile> block and the agent version, not on CrowdSec’s side. Don’t reinstall CrowdSec for a Wazuh reading issue.
The community list makes up half the work
A final word, because this is the point we always underestimate at the start. The day you install CrowdSec, you expect it to learn slowly, to need weeks of traffic before it becomes useful. Wrong.
As soon as the first synchronization, you download the community list, and your sudo cscli decisions list -a populates with IP addresses you’ve never seen. Attackers spotted elsewhere, already blocked at your end. You benefit from the work of tens of thousands of other servers before you’ve even had your first attack.
It’s not magic, it’s volume. Every server that sends up a signal strengthens the defense of all the others. It’s exactly the model that the American SaaS sells you expensively and under its jurisdiction, except here it’s open source, self-hosted, and the shared signal is limited to the address of your attackers.
The turning point is passed. Where your SIEM used to just observe, it now blocks.
For the impatient
What this article does. We install CrowdSec on the hardened VPS to block malicious IP addresses known locally and signaled by the community network. The engine reads your logs and decides, the firewall bouncer applies the block on nftables or iptables, and every decision shows up in Wazuh via a file of alerts read by the agent. The defense goes from “seeing” to “barricading the door”.
Concretely, the commands.
- Install the engine:
curl -s https://install.crowdsec.net | sudo shthensudo apt install crowdsec. - Check the detected collections:
sudo cscli collections list. - Install the firewall bouncer according to your backend:
sudo apt install crowdsec-firewall-bouncer-nftables(or-iptables). - Check the connection:
sudo cscli bouncers list. - Check the machine:
sudo cscli metricsandsudo cscli decisions list -a(the-afor seeing also the community list). - Test the blocking:
sudo cscli decisions add --ip 192.0.2.1 --duration 4h --reason "test"thensudo cscli decisions delete --ip 192.0.2.1. - Check the community sharing:
sudo cscli capi status. - Integrate with Wazuh: enable the file notification plugin in
/etc/crowdsec/notifications/file.yaml(output/var/log/crowdsec/crowdsec_alerts.json), declare it in/etc/crowdsec/profiles.yaml, then add the<localfile>JSON block to the Wazuh agent’s configuration.
In summary
You started with a SIEM that saw attacks but couldn’t stop them, and now you’re ending with a first line that blocks them.
You installed the CrowdSec engine on your hardened VPS, which reads your logs and decides. You put the firewall bouncer, which applies these decisions on your firewall and really blocks. You connected the community list, which protects you from attackers you’ve never seen yourself, by only sharing their addresses. And you made everything show up in Wazuh, so your control room finally sees this defense layer.
It all stays with you. The engine is self-hosted, no decision depends on a third party, and the only signal that goes out is the IP address of your attackers. The protection collective without the dependence, that’s precisely the sovereign third way, opened in the series’ introduction episode.
You now block at the network level. But your most frequent attacks don’t come through the SSH port, they come through your mailbox. In episode 5, we’ll put the anti-spam and anti-phishing filter in front of your mail server, the most exposed door of all.
Technical terms? Check the glossary.